
 Cn
Cn En
En WeChat ID:

The current position:Home > Information dynamic
> Industry Trends
How to efficiently drain the disposable negative pressure drainage device
source:m.zzykcz.com | Release time:2025年10月14日1、 Prerequisite: Select the appropriate device to ensure "hardware qualification"
The basis of efficient drainage is to choose a device that matches the patient's condition and wound type, in order to avoid a decrease in drainage efficiency caused by unsuitable devices
1. Select specifications based on wound/cavity type:
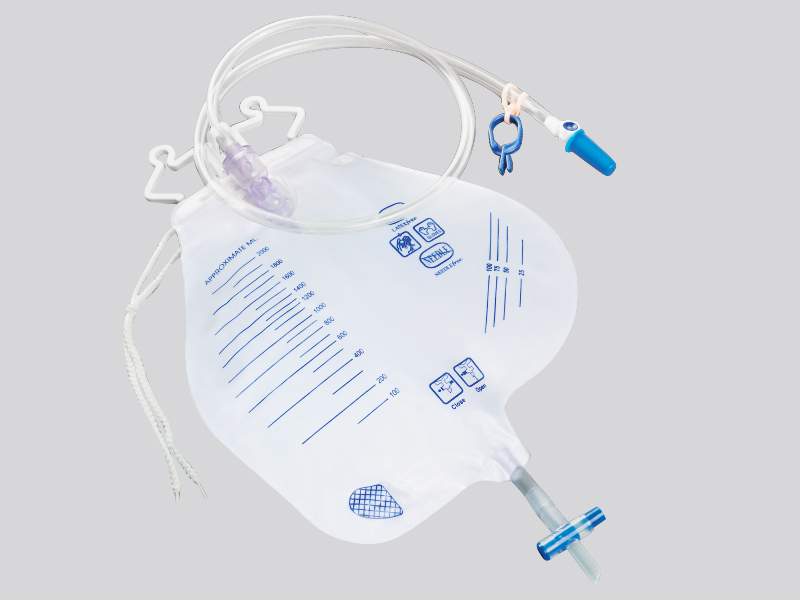
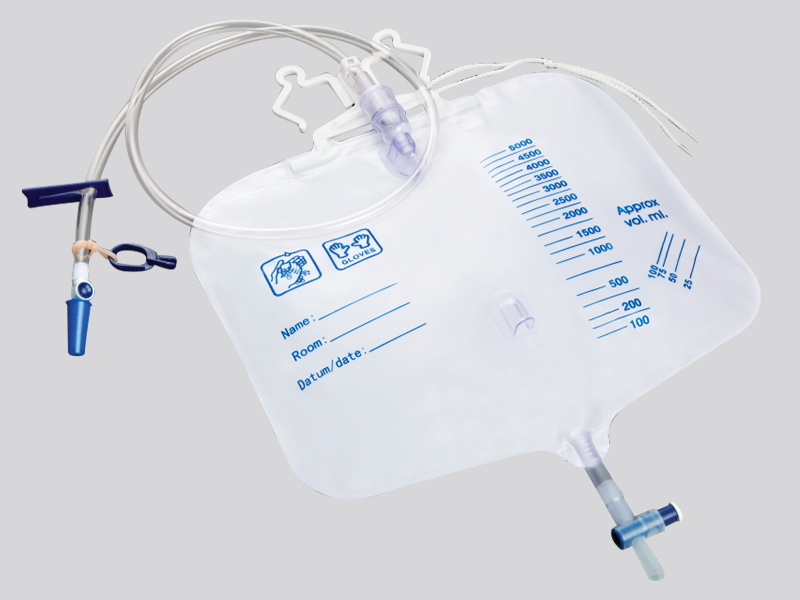
Surface shallow wounds (such as trauma and postoperative incisions): choose a small caliber drainage tube (such as 8-12 Fr)+a small negative pressure storage tank (50-200ml) to avoid excessive negative pressure damage to tissues;
Deep cavities (such as abdominal cavity, chest cavity, and abscess cavity): Choose a large-diameter drainage tube (14-24Fr, with side hole) and a large capacity storage tank (500-1000ml) to ensure the smooth discharge of thick secretions (such as pus and bloody exudate);
Hypertonic/corrosive fluids (such as bile and pancreatic juice): Choose a corrosion-resistant drainage tube (such as silicone material) to avoid the tube wall being corroded and blocked.
2. Confirm negative pressure stability:
Priority should be given to devices with negative pressure indicator windows/pressure gauges (such as negative pressure values that can display -80~-125mmHg, within the effective negative pressure range of clinical practice), to avoid blind use without indication and prevent insufficient or excessive negative pressure.
2、 Core: Standardize operational procedures and establish an "effective drainage channel"
Improper operation can directly lead to drainage failure, and it is necessary to strictly follow the three-step method of "positioning fixing adjusting negative pressure":
1. Place the drainage tube correctly to ensure "direct access to the lesion"
Surface wounds: The side hole of the drainage tube should be completely placed at a lower position of the wound (using gravity assisted drainage) to avoid the side hole sticking to the edge of the wound or exposing the skin outside;
Deep cavity: Guided by ultrasound/CT, ensure that the port of the drainage tube is located at the deepest part of the fluid/pus accumulation, and all side holes need to enter the cavity (to avoid negative pressure leakage caused by some side holes being in normal tissue).
2. Seal the wound with a fixing device to avoid "negative pressure leakage"
Wound sealing: Use sterile transparent patches (such as polyurethane patches) to completely cover the inlet of the drainage tube and the surrounding wound, with the edge extending ≥ 3cm beyond the wound. Press the patch to eliminate air and ensure that there are no wrinkles (wrinkles can cause air to enter and reduce negative pressure);
Device fixation: The drainage tube needs to be fixed on the surface of the skin with adhesive tape (to avoid displacement caused by pulling), and the liquid storage tank is suspended on the side of the hospital bed (lower than the level of the wound, using gravity to assist drainage and avoid liquid reflux).
3. Set appropriate negative pressure to avoid "improper negative pressure"
Conventional wounds (such as postoperative exudate): The initial negative pressure is set to -80~-100mm Hg. If the drainage fluid is thin (such as blood sample), it can be appropriately adjusted to -100~-125mmHg;
Thick liquids (such as pus or blood clots): Start with -60~-80mmHg and observe the drainage situation. If the drainage is not smooth, slowly increase to -100mmHg (to avoid tissue damage or blockage of the lumen caused by high negative pressure);
Taboo: It is strictly prohibited to have negative pressure exceeding -150mmHg (which can damage capillaries), or negative pressure below -50mmHg (which cannot effectively attract liquids).
3、 Key: Dynamic maintenance and management to maintain "continuous smooth drainage"
Regular inspections are required during the drainage process to promptly address issues such as blockages and leaks, ensuring drainage efficiency
1. Regularly observe the drainage status (once every 1-2 hours)
Check negative pressure: Observe the negative pressure indicator window (if it displays "insufficient negative pressure", check whether the wound seal is intact, whether the drainage tube is folded, and whether the liquid storage tank is full);
Observing fluids: Record the color, quantity, and characteristics of the drainage fluid (if there is a sudden decrease, it may be due to tube blockage; if there is a sudden increase or turn bright red, be alert to bleeding);
Check the pipeline: Check if the drainage tube is bent or twisted (especially when the patient flips over, the pipeline needs to be reorganized to keep it straight and unobstructed).
2. Timely address blockages (the most common issue affecting efficiency)
Gentle squeezing: If there is suspicion of blockage in the lumen (sudden decrease in drainage fluid, normal negative pressure but no liquid outflow), use your fingers to gently squeeze from the distal end of the drainage tube towards the storage tank (avoid squeezing from the proximal end to the distal end to prevent liquid from flowing back into the wound);
Physiological saline flushing: If squeezing is ineffective, 20ml of sterile physiological saline can be slowly injected into the drainage tube under aseptic operation (pressure should not be too high), wait for 5-10 minutes, and then observe. If it is still blocked, the drainage tube needs to be replaced (do not forcefully pass the tube to avoid tissue damage).
3. Regularly replace the device (according to the specified time)
Liquid storage tank: When the liquid reaches 2/3 of the tank capacity, it should be replaced in a timely manner (filling the tank will cause negative pressure to not be transmitted and drainage to stop). When replacing, first clamp the drainage tube and then disconnect it to avoid air entering the wound;
Complete set of equipment: Under normal circumstances, it should be replaced every 7 days (if the drainage fluid is heavily contaminated, such as pus, it can be shortened to 3-5 days) to avoid infection caused by long-term use.
4、 Addendum: Pay attention to special circumstances and avoid "ineffective drainage"
1. Patient cooperation management
Inform the patient to avoid pulling the drainage tube and adjusting the negative pressure value arbitrarily. When turning over or moving, protect the device to prevent the tube from shifting or the application from falling off.
2. Infection prevention and control
Strictly follow aseptic procedures when replacing the storage tank/drainage tube, and regularly disinfect the skin around the wound with iodine to avoid wound infection caused by operational contamination (infection can increase secretion viscosity and reduce drainage efficiency).
Prev:
How to reduce medical costs with disposable drain…
Next:
What are the uses of disposable bladder irrigators
【Related articles】
【Related products】


- Navigation
-

addressNo. 156, Xinyang Avenue, Xinzhuang Town, Changshu, Jiangsu
-

phone0512-52479291/52479292
-

mailboyi_yl@163.com
 Contact us
 Add WeChat
 Telephone